Few protective styles offer as much versatility as bantu knots. Not only do they work beautifully as a standalone style, but taking them down reveals a completely different look — springy, defined curls known as a bantu knot out. Learning how to do Bantu knots essentially gives you two hairstyles for the effort of one, making this one of the most efficient techniques in any natural hair routine.
This tutorial walks through both halves of the process: installing the knots themselves, and then taking them down to create beautifully defined curls afterward. Whether you’re after the sculptural, coiled look of the knots or the bouncy curls that come from unraveling them, this guide covers exactly how to get there.
What Are Bantu Knots?
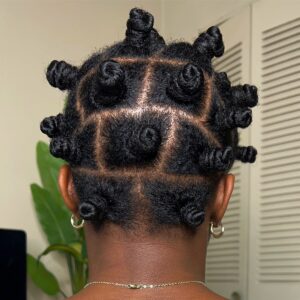
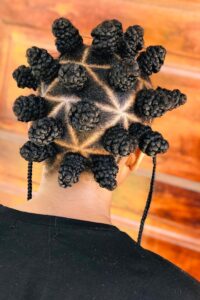
Bantu knots are a traditional African hairstyle created by sectioning hair into small parts, twisting each section, and then wrapping it around itself to form a tight, coiled knot against the scalp. They can be worn as a finished style on their own or used purely as a heatless curling method, with the curls revealed once the knots are taken down.
Benefits of Bantu Knots
- Two styles in one. You get a distinctive, sculptural look while the knots are in, and defined curls once they’re taken down.
- Heatless curling. Because the curl pattern forms naturally from the twisted, coiled shape, there’s no heat styling involved at any point in the process.
- Protective while installed. With ends tucked into each knot, this style minimizes friction and manipulation while it’s in.
- Works on a range of hair lengths. From shoulder-length to much longer hair, bantu knots can be sized and adjusted to fit what you’re working with.
What You’ll Need
- A rat-tail comb for clean sectioning
- Hair clips to hold sections out of the way
- A leave-in conditioner and/or curl cream
- Optional: bobby pins or small hair ties to secure larger knots
- A satin or silk scarf or bonnet for overnight protection
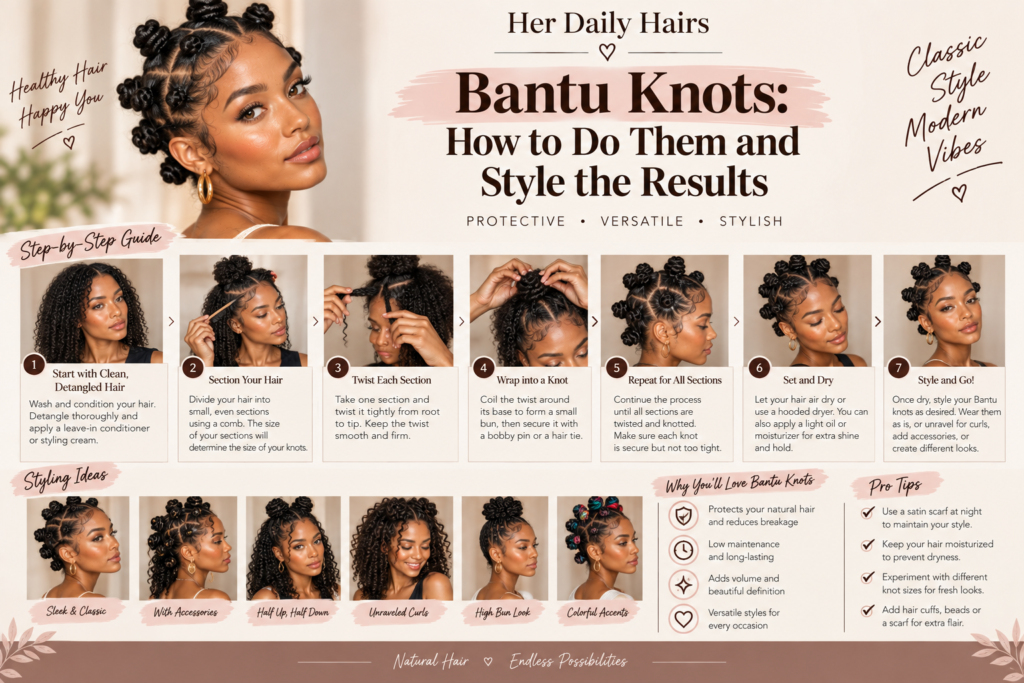
Part 1: How to Do Bantu Knots
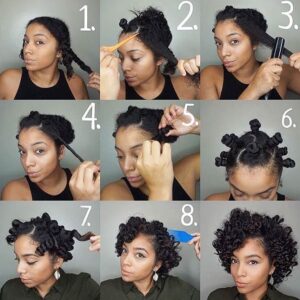
Step 1: Start with Damp, Detangled Hair
Bantu knots hold their shape best on clean, detangled, slightly damp hair. Fully dry hair can be used, but damp hair tends to create more defined curls once unraveled later.
Step 2: Apply Your Styling Product
Apply a leave-in conditioner and/or curl cream throughout your hair before sectioning. This helps with moisture retention while the knots are in and contributes to smoother curl definition once they’re taken down.
Step 3: Section Your Hair
Using a rat-tail comb, divide your hair into small to medium square or triangular sections, depending on how many knots you want and how large you’d like the resulting curls to be. Smaller sections create more, tighter curls; larger sections create fewer, looser waves.
Step 4: Twist Each Section
Take one section and twist it tightly from root to end, working in one consistent direction. The tighter the twist, the more defined the resulting curl will be once unraveled.
Step 5: Wrap Into a Knot
Once the section is fully twisted, wrap it around its own base, coiling it into a tight knot against the scalp. Tuck the end underneath the coil to secure it, using a small bobby pin if needed to hold it in place.
Step 6: Repeat Throughout Your Hair
Continue sectioning, twisting, and knotting until your entire head is done. Take your time with each section — rushed or loose twists tend to unravel prematurely and create less defined curls later.
Step 7: Protect Overnight
If you’re keeping the knots in for more than a day, cover your hair with a satin or silk scarf or bonnet to protect the style from friction while you sleep.
How Long Should Bantu Knots Stay In?
Bantu knots can be worn as a standalone style for several days to a week or two, depending on how well they hold up and how your scalp feels. If you’re using them purely as a curling method rather than a longer-term protective style, they typically only need to stay in until your hair is fully dry — usually overnight or up to 24 hours, depending on how damp your hair was when you installed them.
Part 2: How to Style a Bantu Knot-Out
Step 1: Make Sure Hair Is Fully Dry
Before unraveling any knots, confirm your hair is completely dry. Unraveling damp knots typically results in less defined, frizzier curls, since the hair hasn’t fully set into the twisted shape yet.
Step 2: Apply a Small Amount of Oil to Your Hands
A lightweight oil on your fingertips helps smooth frizz and adds shine as you unravel each knot, without weighing down the curl definition underneath.
Step 3: Unravel Each Knot Gently
Starting from the end of each twist, gently unwind the knot rather than pulling it apart quickly. Unraveling too fast can cause the curl to lose its shape or create excess frizz.
Step 4: Separate Curls to Your Desired Fullness
Once all the knots are unraveled, you can leave the curls clumped together for a more defined, ringlet-style look, or gently separate them with your fingers for a fuller, more voluminous finish.
Step 5: Style as Desired
From here, you can wear your bantu knot-out down, pull the front pieces back, or pin sections up for a half-up variation — the resulting curls hold up well to a variety of finishing touches.
Tips for the Best Bantu Knot-Out Results
- Twist tightly and consistently. Loose or uneven twists lead to uneven, less defined curls once unraveled.
- Don’t rush the unraveling process. Gently working through each knot preserves more curl definition than quickly pulling them apart.
- Use the right amount of product. Too little product can lead to frizz, while too much can weigh down the curls and reduce volume.
- Protect your knot-out at night. Once you’ve achieved the curls you want, sleeping with a satin bonnet or on a satin pillowcase helps the style last longer before frizzing out.
Bantu Knot Size Variations and What They Create
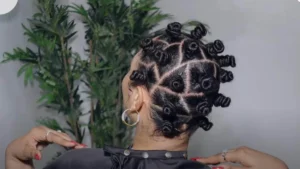
The size and number of knots you install has a direct impact on the final curl-out result:
- Small, numerous knots create tight, springy curls similar to a coil pattern, ideal for those wanting maximum definition and volume.
- Medium knots produce a balanced, classic ringlet look that works well for most hair lengths and is often the easiest starting point for beginners.
- Large, fewer knots result in loose, wave-like bends rather than tight curls, which can be a good option for those wanting a softer, more subtle texture change.
Experimenting with knot size on different sections of your hair (or trying a few different sizes across a couple of styling sessions) is a good way to figure out which result you like best for your hair length and density.
Frequently Asked Questions About Bantu Knots
How many bantu knots should I do? This depends on your hair length, density, and how defined or loose you want the resulting curls to be. More, smaller knots create tighter, more numerous curls, while fewer, larger knots create looser, wave-like results.
Can I sleep in bantu knots? Yes — bantu knots are commonly worn overnight specifically as a heatless curling method, making them a popular styling step before a special event or simply for a curl refresh the next morning.
Why did my bantu knot-out come out frizzy instead of defined? This is usually caused by unraveling the knots before hair is fully dry, twisting too loosely during installation, or not using enough product to hold the curl shape as it dries.
How long do bantu knots take to install? Depending on hair length, density, and the number of knots, installation typically takes anywhere from 30 minutes to over an hour.
Can bantu knots damage natural hair? When installed with reasonable tension and taken down carefully, bantu knots are generally a low-damage styling method. Excessive tension at the root or repeatedly unraveling knots too roughly can contribute to breakage over time, so gentle handling at both stages of the process matters.
Do I need extensions to do bantu knots? No — bantu knots are typically done using only your natural hair, without any added extensions. This makes them one of the more accessible protective and curling styles, since they don’t require a trip to the beauty supply store or a salon visit.
Final Thoughts
Bantu knots prove that a single protective style can deliver two completely different looks — a bold, sculptural style while installed, and beautifully defined curls once unraveled. With a bit of practice on sectioning, twisting, and unraveling technique, this two-in-one method can become one of the most efficient additions to your natural hair routine.
Loved this tutorial? Save it to Pinterest so you have both looks ready for your next styling session.
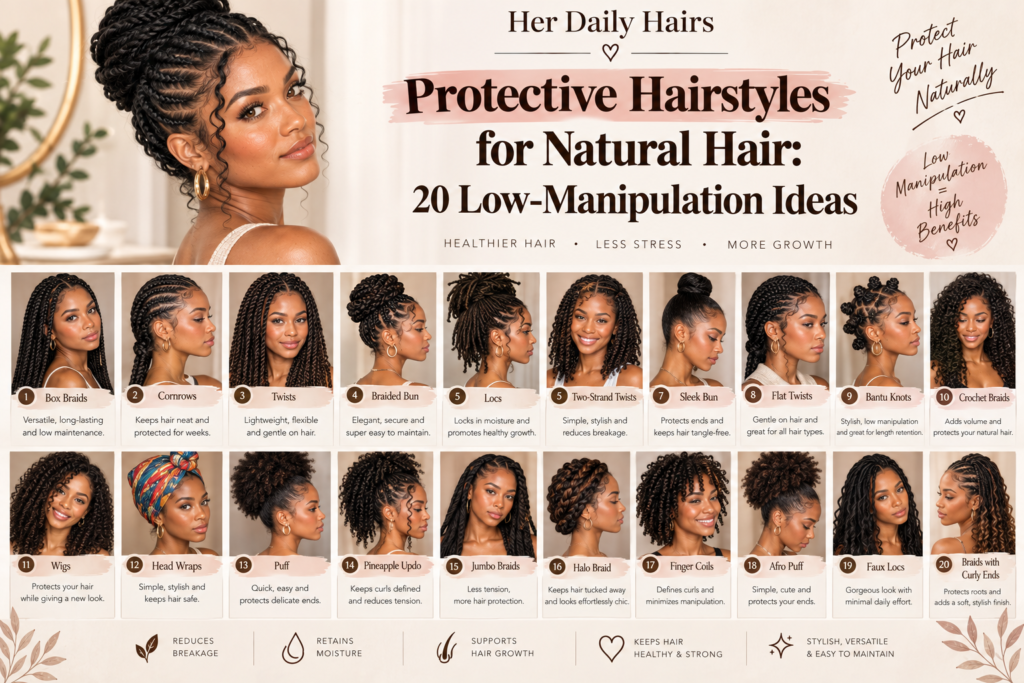
Looking for more natural hair tutorials? Check out our guides on Protective Hairstyles for Natural Hair: 20 Low-Manipulation Ideas and How to Do a Wash and Go for Curly Hair for more heatless styling ideas.